Showing posts with label crafts. Show all posts

Sunday, November 30, 2014

My Report Card

At the beginning of November I posted a list of projects I wanted to accomplish during the month. So, now it's time for show and tell…

1. Prepare gardens for winter.     Incomplete. But, it isn't 'cause I didn't do something!! The only thing that remains unfinished is turning the vegetable garden, and putting a fence around the tulips. I decided wracking my elbow wasn't worth it.  Grade: C

2. Create!     In progress. I have completed gifts for one son and the MIL. I prepared the gourds for painting.  (Oh, how I wish I could put pictures up of the gifts I made… but I know at least one recipient checks out my blog now and then!)    Grade: C+

3. Complete the sweater I began knitting for my grand niece.    Still knitting! I did make some progress, but I still have a sleeve and a half and trim. Grade D

4. Enjoy Dad.   I get an A+ in this. Well, maybe a B. I hauled out some items and visited almost every day. I made a cushion holder for the gel cushion he uses in his wheel chair, to keep it from slipping forward, and I made a side-support for the wheel chair, since he tends to list to the left, his weaker side. I found some 'tools' at several different 2nd hand shops (did you know that the word 'toy' came from the word 'tool'?). Dad constructs with MegaBlocks and tinkers with an Italian gear toy. I also found a nifty architect toy tool, where he can design houses. It's a bit beyond him, but he does use it now and then. I also found a knobby ball that, with prompting, helps him exercise his left hand. My favorite thing, however, is the "console" I made for him. Perhaps this should raise my grade for creating! What do you think?


It keeps him busy!

5. Make basement habitable.  I painted. I vacuumed. I sorted and moved stuff. I put together the missing can lights and put new bulbs in. I put up pictures. I 'scored', finding two bed spreads at the Salvation Army on 1/2 price day… $5 each! I converted an extra cabinet door into a hat/coat hanger.  I remade the dresser into the vanity for the bath… AND, I cleaned the toilet! Ta-daaa! I haven't bothered to clean it since we moved in, and who knows when it was last cleaned before we purchased the house! Then, I messed it all up again in doing my sewing projects. I still need to move the exercise equipment between the two day beds. I couldn't manage that on my own, but now that Mr. Dreamy is home….   Final Grade: B-


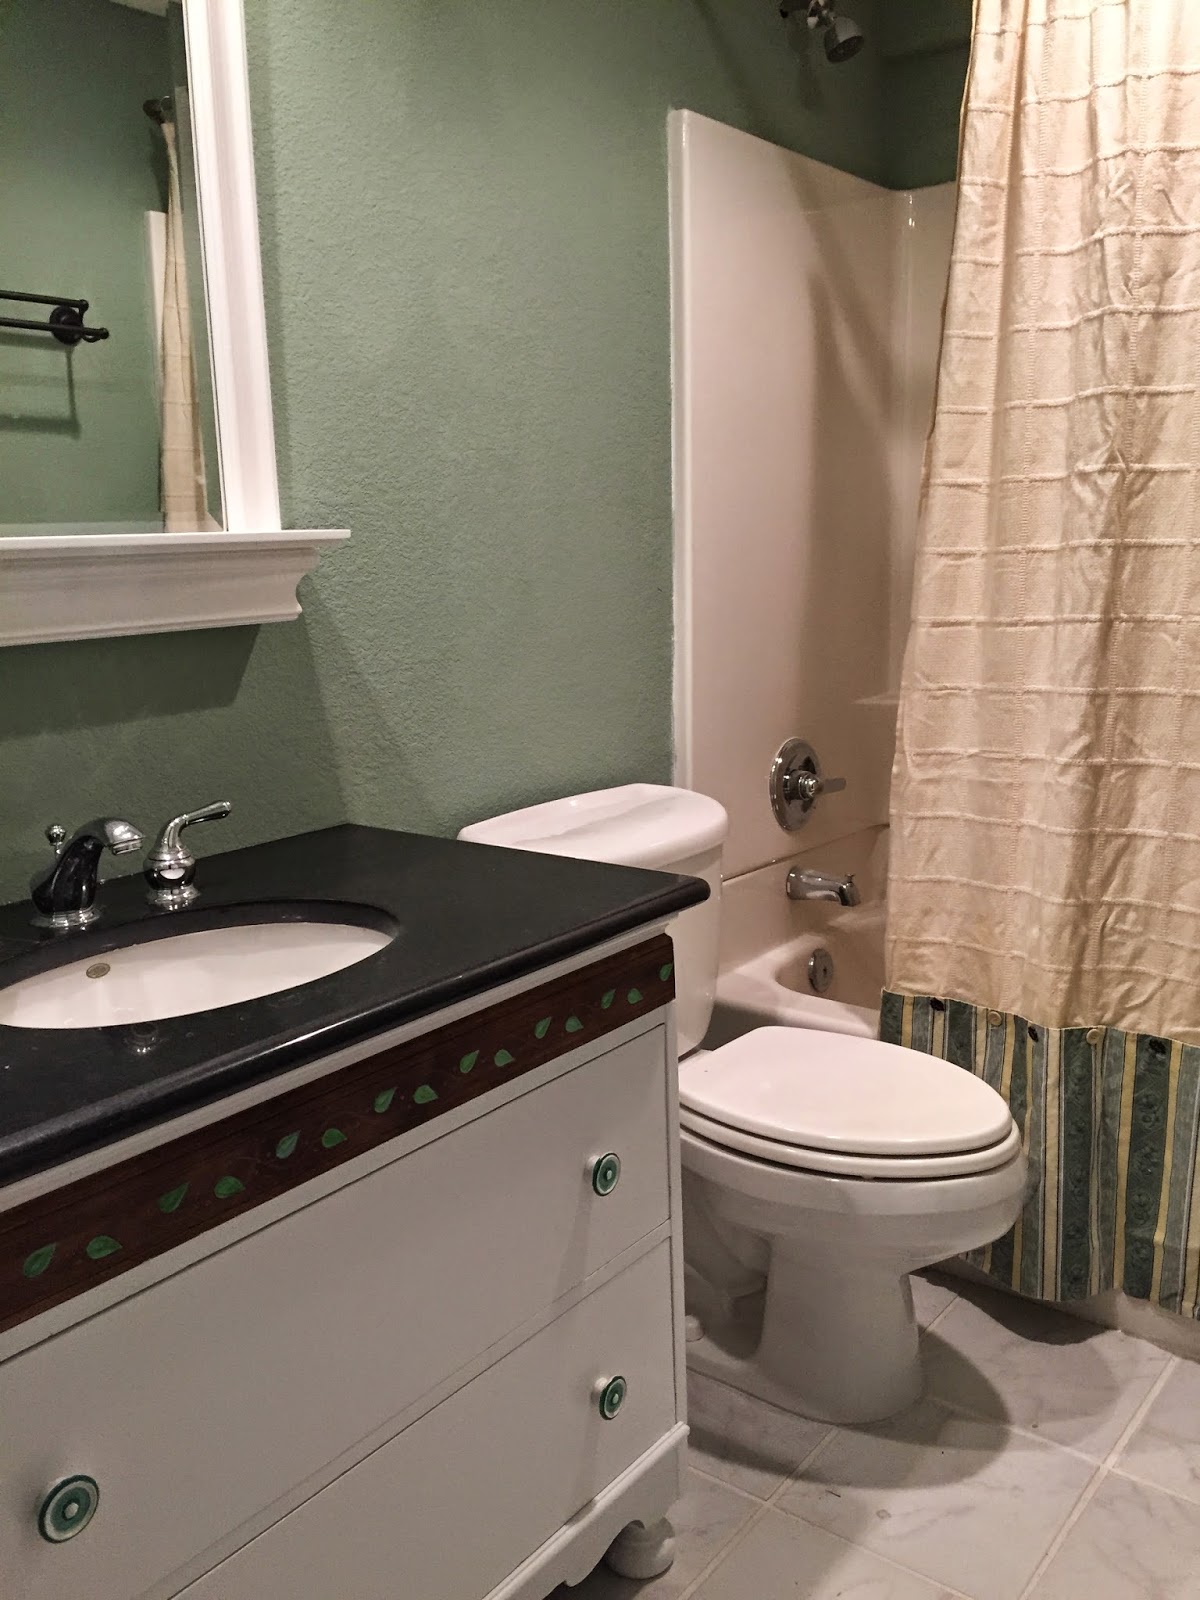
(Mr. Dreamy helped me get the counter/sink on the dresser
when he got back this afternoon!)


6. Finish making quilled Christmas cards.


Well, I made a few. My quilling supplies were with Mr. Dreamy in Florida, so at this point all I could do is put together the cards, and use the few quilled prototypes I made before we left on our trip this fall to finish a few. Actually, after all this effort, I'm not sure I care for them. Oh well, it's better than sending nothing!  Grade: C


So, I didn't fail. I did put a lot of effort into everything. I simply had a problem finishing what I started. Uh, oh. I've heard comments about that throughout my life! 

As much as I groused about creating a list, I did like the idea of having specific things to focus on as the month progressed. Would I have accomplished as much without having created and posted the list? Probably, as there are a number of things I did accomplish that weren't even on the list.  

So, what about December?  

I think I'll forego an actual "to-do" list as almost all of it revolves around preparing the house for the holidays and for guests, and everything that goes along with that (cleaning, organizing, planning menus and getting food, gifts, etc) All I know is that Christmas will be here before I know it… and I have a lot of things to accomplish!

How about you? What are your "must do's" for the coming month?

Wednesday, April 14, 2010

Craft Corner - Greeting Cards

In this day of instant communication including email, IM, text messaging, and Tweeting, it is still nice to send or receive a handwritten note. It is even nicer if that note comes on a handcrafted card!
I like making cards and find that it is very relaxing. It's also very easy...oh, and I might add, addictive! There have been many evenings when I have crawled into bed very late because I had to make one more card, or add one more embellishment, or find the perfect paper to line an envelope. I do have some stamps and embossing powders; I have tiny embellishments that always seem to find their way into the carpet and make a terrible noise when I finally decide to vacuum. I have a variety of ribbons and some fancy scissors and punches. But, you don't need all of that to make a beautiful card.

Basic Materials Required

  • colored card stock - available at craft stores by the single sheet. 8 1/2" X 11" or 12" X 12". The smaller size can be cut in half to create two invitation size cards. The larger piece will make two cards, either invitation size or one invitation size and one larger. You will also have some scraps that come in handy for adding contrasting or coordinating trims.
  • decorative scrapbook papers - also available by the single sheet in both sizes. Many stores have color-coordinated thematic series.
  • photo paper or white card stock for the computer (regular printer paper could also be used)
  • computer and printer
  • a picture of your favorite horse or your favorite picture of a horse uploaded into the computer
  • one or more quotations or sentiments formatted in a pleasing color, size and font, possibly with a colored border and/or background.
  • glue stick - I find that the UHU stic has a nice, permanent bond, especially on photo paper, but there are many brands out there that will also work.
  • scissors - if you decide that you like making cards, investing in a paper trimmer helps make straight cuts, especially for cutting card stock down to size.
  • envelopes - invitation envelopes are available at craft and office supply stores.
Directions:
  1. Cut the card stock to the appropriate size. For invitation size: 8 1/2" X 5 1/2". For announcement size: 6 1/2" X 10".
  2. Design and print your sentiments and photos. I put them on one sheet of photo paper but they could easily be printed on white card stock or white computer paper.
  3. Trim the decorative papers. I cut a rectangle for the background that is about 4" X 5 1/4" so that when it is glued on the card stock, a border of the card stock shows around the decorative paper. Cut your decorative paper smaller for a larger border, or experiment with tearing the paper, using strips of paper or a combination of several papers.
  4. Trim the photos and the sentiments. Mount them on scraps of card stock and/or on scraps of the decorative paper. Sometimes I use additional layers of scrap paper to add dimensionality to my pieces. You can also buy foam dots or 8 1/2 X 11 sheets of foam to mount pieces on your card that you want to stand out. The foam dots come pre-glued.
  5. Use scraps to enhance your design. I added a "ribbon" of paper and a partial circle on one card.
  6. Experiment with the layout of your papers, scraps and images. Decide if you want your card to be a landscape or portrait view. Once you have a design that pleases you, glue them in place.
  7. I like the look and feel of lined envelopes. I created a template that I use to trace the shape on the decorative paper. I slip the lining in the envelope, fold it on the crease of the flap so the lining is just below the glue line on the envelope. I run a stripe of glue on the lining to glue it in place just below the glue line on the envelope. This way the lining can move slightly when you open or close the envelope.
  8. If your card stock is too dark for writing to be seen, cut a sheet of computer paper slightly smaller than the card stock and fold it in half. Put one stripe of glue on one outer edge near the fold to glue the paper into the card. In this way the lining doesn't glue your card open or closed.
So, you can see how easy it is to make attractive greeting cards with only a few supplies. You can add your own creative touch to the cards by using brads, buttons, clips, different papers, ribbons and so forth. Here are some examples of cards I have made:

This card uses torn paper, a ribbon and a square brad. I used an olive colored stamp pad to color the edge of the torn paper. The photo and sentiment are printed on glossy photo paper and are mounted on scraps. The paper's edge behind the sentiment has been cut using special scissors. This is a Mother's Day card with the sentiment from Carrie Latet saying, "The best conversations with mothers take place in silence, when only the heart speaks."


This card makes use of torn paper to create a frame for a sentiment that was printed on parchment paper mounted on the plaid contrasting design. A ribbon adds additional texture. About 1/2" was cut from the bottom edge of the card's top and a strip of the plaid paper was glued on the inside bottom edge.


This card is made from textured card stock. I put a small piece of contrasting paper to add a shot of color. The photo and sentiment are mounted on card stock and decorative paper scraps. I put ribbon through the holes of two heart-shaped buttons and I used the same sentiment for Mother's Day.


This card uses my favorite 'cowboy' papers; the bucking bronco and the neckerchief designs. I also made use of some textured brown paper. The sentiment is printed on parchment paper and mounted on the scrapbook paper. I used star-shaped brads as embellishments.

Monday, March 15, 2010

Craft Corner - Bit Warmers


For some of you lucky people this post may be coming too late to be of use this year, but what the heck, you can get a head start on next winter! Many of my friends are already experiencing warm temperatures, flowers, sunshine and spring - I can only dream! Please send nice thoughts to those of us who are anticipating spring snow storms - some of the worst for the year. Last year we had a total of 5 feet of snow between March 15 and May 12!


This was our yard following a storm on April 18 last 'spring'!!


Materials needed to make a bit warmer:

  • 6" x 14" fabric rectangle
  • 1 bag or box of rice
  • sewing machine and/or needle and thread
Instructions for making a bit warmer:
  1. Cut the fabric to the appropriate size and fold it with right sides together.
  2. Use a sewing machine or stitch by hand using stitches no larger than 1/8" in length. Maintain a seam allowance of 3/8" - 1/2" and stitch from the fold going up one side, across the top and down towards the fold, leaving 1 1/2" open at the end.
  3. Trim seams to 1/4" and turn the rectangle right side out.
  4. Pour rice into the opening. Put enough rice in the warmer so that when it is folded the rice remains near the fold. If you use too much rice you can't fold the bit warmer, too little and the rice falls below the fold if you put it over a bit. I used about 1 1/2 cups of rice for each warmer.
  5. Use a needle and thread to close the opening.


Instructions for using the bit warm
er:

  • Heat the bit warmer in the microwave for 1 minute.
  • Drape the bit warmer over the bit.
  • Let the warmer work its magic while you groom your horse.
  • Bridle your horse with a warm bit. (Do check to make certain it is not too hot!)

I recently gave some bit warmers to my friends as gifts. I include the following poem with the bit warmer:

The weather is cold and my bit's like ice.
Warming it up would be really nice.
Put this in the microwave on high for a minute.
The heat will be absorbed by the rice that's in it.
Drape it on my bit while you get me tacked,
And I'll be much happier when you get on my back!

Thanks to Once Upon an Equine for suggesting that I include these instructions on my blog.
Enjoy your bit warmers!

Games Corgis Play

 I discovered that our Corgis love to play, "Where's the Corgi?" If I'm changing the sheets on the bed, or handling large ...